Birds flying near a container ship (source)
Introduction
The last blog post explained why you might want to use a Docker container running Pelican to publish your website if you are starting a blog. This post will provide detailed instructions.
Although these instructions are for Ubuntu Linux (Xenial 16.04), the procedure for other operating systems should be similar. This should be good enough to get you started, but you will have to eventually modify the Dockerfile if you want to change the theme or include more plugins. Familiarity with git and the command line are assumed.
Step 1: Install Docker
You will need to install the Community Edition of Docker if you haven't already. The official instructions for Ubuntu are good. See the install page for other operating systems. Be sure to run the hello-world image to verify that docker was installed correctly by entering the command sudo docker run hello-world at the command line.
Step 2: Create a Github Account
If you haven't already, be sure to sign up for a Github account. As mentioned in the last post, there are alternatives, but these instructions are specifically for Github Pages.
Step 3: Create a New Public Repo
You will need to create a new repository for your website. Click on "Repositories" at the top of your github webpage, then click the green "new" button. At the new webpage, type in a name for your repository, such as "mywebsite". Check the box next to "Initialize this repository with a README". You should keep the "Public" radio button highlighted. The webpage should look similar to the image below:
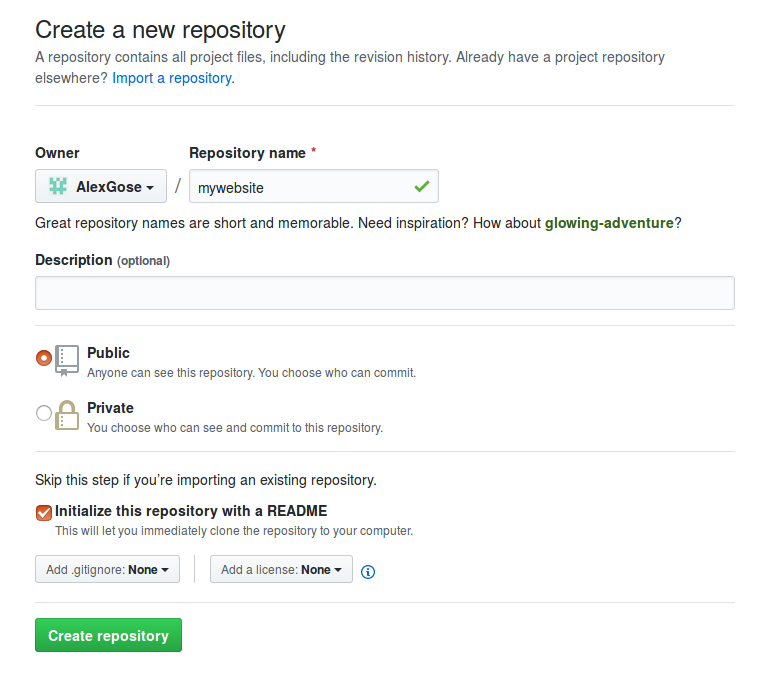
Click the green "Create Repository" button at the bottom of the page.
Open a command line session on your machine (Ctrl+Alt+T in Ubuntu). Move into the directory where you would like to keep the files for your website:
$ cd ~/Documents
Clone the newly created git repository to your machine, replacing username with your github username and mywebsite with the name of your repository:
$ git clone https://github.com/username/mywebsite.git
Move into the newly created directory with the same name as your repository:
$ cd mywebsite
Next, create a content directory:
mkdir content
Step 4: Build the Pelican Docker Image
Download the docker and requirements files:
$ curl -O https://raw.githubusercontent.com/AlexGose/website/062beca904b94abcda254d824a57eec2e5eb236b/Dockerfile
$ curl -O https://raw.githubusercontent.com/AlexGose/website/f9e09b0cc56eec4a1840ccbb1c2270f468b5574c/requirements.txt
You should see a file named Dockerfile in the current directory if you enter ls at the command line. Open up the file in a text editor (e.g., by entering nano Dockerfile at the command line), and type a # in front of the last three lines to comment them out:
WORKDIR /website
#COPY pelicanconf.py /website/
#COPY publishconf.py /website/
#COPY Makefile /website/
Save the file and exit the text editor (Ctrl+O and Ctrl+X in nano).
Next, build the docker image, which we will name pelican:
$ sudo docker build -t pelican .
A lot of output will be printed to the screen as Docker installs the required software. This may take some time. You should see a message indicating that the image was created successfully at the end. You should also see the image listed when you type the following:
$ sudo docker images
Step 5: Create the Build and Configuration Files
Next, we will run the pelican-quickstart program in the docker container:
$ sudo docker run -it --rm -v $(pwd):/website pelican pelican-quickstart
You will be prompted to answer a series of questions to create the build and configuration files:
> Where do you want to create your new web site? [.]
> What will be the title of this web site? "My Website"
> Who will be the author of this web site? John Doe
> What will be the default language of this web site? [en]
> Do you want to specify a URL prefix? e.g., https://example.com   (Y/n) n
> Do you want to enable article pagination? (Y/n)
> How many articles per page do you want? [10]
> What is your time zone? [Europe/Paris]
> Do you want to generate a tasks.py/Makefile to automate generation and publishing? (Y/n)
> Do you want to upload your website using FTP? (y/N)
> Do you want to upload your website using SSH? (y/N)
> Do you want to upload your website using Dropbox? (y/N)
> Do you want to upload your website using S3? (y/N)
> Do you want to upload your website using Rackspace Cloud Files? (y/N)
> Do you want to upload your website using GitHub Pages? (y/N) y
> Is this your personal page (username.github.io)? (y/N)
Done. Your new project is available at /website
Be sure to answer "y" when asked if you will upload your website to Github Pages. When you are done, you will see a number of new files and directories if you enter ls at the command line. This is a good time to commit and push the changes to your remote github repository if you haven't done so already:
$ git add .
$ git commit -m "initial upload"
$ git push origin master
Step 6: Modify the Build and Configuration Files
Next, we will modify the build and configuration files. Open publishconf.py in a text editing program (e.g., by entering sudo nano publishconf.py), and add the name of your website URL to the end of the SITEURL variable:
SITEURL = 'https://username.github.io/mywebsite'
Be sure to replace username with your github username and mywebsite with the name of your repository in the URL. Save this file and open pelicanconf.py next. You can modify the timezone by changing the quoted text after TIMEZONE. You can look up the possible values here. Comment out the lines for the LINKS and SOCIAL variables, putting a # at the beginning of each line, if you do not wish to include those on your website. If you wish to include links to your social media sites, then you can see an example of how this is done here.
At the bottom of this file add these lines for the pelican-bootstrap3 theme:
THEME = 'themes/pelican-bootstrap3'
PLUGIN_PATHS = ['plugins/', ]
PLUGINS = ['i18n_subsites', ]
JINJA_ENVIRONMENT = {
    'extensions': ['jinja2.ext.i18n'],
}
After saving and closing this file, open the Makefile in a text editor. Here, we will add a new .git target and modify the existing github target. The bottom of the file should look like this when you are done, with your username replacing username and your repository name replacing mywebsite:
.git:
    git init
    git remote add origin -f https://github.com/username/mywebsite

github: publish | .git
    ghp-import -m "generate pelican website" $(OUTPUTDIR)
    git push origin gh-pages

.PHONY: html help clean regenerate serve serve-global devserver publish github
Save, commit, and push the changes to github as we did previously:
$ git add .
$ git commit -m "add build and configuration files"
$ git push origin master
From this point on, I'll assume you will commit and push changes to github whenever you modify a file in this directory.
Step 7: Create Some Content
Move into the content directory:
$ cd content
Here is where you will store the content of your blog website in the form of markdown files, which are specially formatted plain text files. Markdown is easy to learn if you don't already know it. Check out this website for example. I recommend learning how to format headers and hyperlinks first. You can pick up the rest later as needed.
Using a text editor, open a new file named "testpost.md", and add the following lines:
Title: Test Blog Post
Date: 2019-01-01
Tags: Test, Blog
Summary: A test blog post

## Level 2 Header

This is a test blog post.
Save this markdown file in the current content directory, and move back to the parent directory:
$ cd ..
Be sure to read the Pelican documentation for more information on writing content.
Step 8: Build A Local Development Server
Open up the Dockerfile in a text editor and remove the # from the beginning of the last three lines to uncomment them. Save the changes and re-build the docker image:
sudo docker build -t pelican .
Now, we will build the website locally to see how it looks before publishing it on Github Pages:
sudo docker run --rm -it -p 8000:8000 -v $(pwd)/content:/website/content:ro -v $(pwd)/output:/website/output pelican make devserver
You can see the website by visiting http://127.0.0.1:8000 in a browser. To stop the development server type Ctrl+C in the terminal window.
Step 9: Publish the Website
Next, we publish the website to github:
sudo docker run --rm -it -v $(pwd)/content:/website/content:ro -v $(pwd)/output:/website/output pelican make github
You will be prompted for your username and password while the ghp-import program sends output files into the "gh-pages" branch of your github repository. After waiting a number of minutes, your website should be accessible at "https://username.github.io/mywebsite" with the username and repository name changed appropriately.
Conclusions
Hopefully these instructions are enough to get you started with publishing your blog website using Pelican running in a Docker container. You should be able to create new content with the development server running. You just need to refresh the browser page to see the changes. Once you push the changes to github, you can publish the website to Github Pages by entering the same command we used in Step 9.